Friday, November 29, 2013

Fruit Crisps

One of my favorite desserts is a Fruit Crisp. Living in California, there are so many fruits available nearly year round to choose from: nectarines, peaches, cherries, blueberries, raspberries, plums, apples.....and in any combination. I love these desserts because they are a great way to enjoy fruit, and are so easy to make. They are simply fruit plus a streusel topping, then baked until the fruit is bubbly and the topping is a nice golden brown. What could be better?

There are a few variations of the "crisp". A "crumble" is very similar while a "cobbler" uses a flour-based covering over the fruit. I prefer crisps and crumbles because of the addition of nuts and oats. I think those compliment the fruit the best.  Flour just seems to weigh it all down.

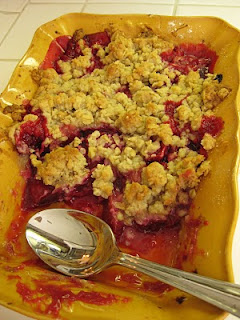
I once watched an Ina Garten episode on the Food Network where she made a "Plum Crumble" that sounded divine. I've made it a few times, sometimes varying the topping a bit. I cut the recipe in half because there are only 2 of us here. This is the full recipe. At this time of year you could substitute apples if you wish, depending on where you live. We can still get plums here in California. Our apples aren't quite ready yet.

Plum Crumble

Filling:
3 lbs. plums
1 1/2 cups brown sugar
1/4 cup flour* (this helps thicken the sauce)
6 Tbsp. cassis (or any liqueur that compliments the fruit). Sub Calvados if you're using apples; Kirsch if you're using cherries; etc.

Mix together and put into a 12" x 8" baking dish.
Topping:
1 1/2 cups flour**
3/4 cup sugar
3/4 cup brown sugar
1/2 tsp. salt
1 cup oats
1/2 cup walnuts, roughly chopped
2 sticks cold butter, diced

Mix the topping ingredients in a food processor until crumbly.

Cover all the fruit with the topping, making clumps, otherwise it might dissolve into the fruit.

Bake 30 minutes at 375 F until topping is golden brown.

Recipe courtesy of Ina Garten's Barefoot Contessa.

*If you're on a gluten free eating plan, substitute 1 Tbsp. corn starch (preferably organic, as corn is largely genetically modified in America) by mixing it in with the cassis.

**For a gluten-free option, you can use tapioca flour here.

Friday, November 22, 2013

How not to hate Brussels Sprouts

I always hated Brussels sprouts, mostly because of the way they smell when they cook. They have this acrid, malodorous scent that I find simply disgusting.  Then one day, my sister tells me she roasts them and that parboiling them for a few minutes beforehand in boiling water helps with that nasty smell. Since I love anything roasted I tried it last year and made them for Thanksgiving. They were pretty good and since then I’ve made Brussels sprouts from time to time trying to love them. But it wasn’t until I tried them from a food truck that I thought, wow, these are incredible!

Nearly every Thursday, a food truck comes to my office building during lunch. Being a foodie, I usually go online and check the menu of the truck in question. Usually it's the usual, tacos and burgers, so I pass, but one day I saw this dish, Brussels Sprouts with Bacon, and thought, mmhhhh, that sounds pretty good. I mean, really. Bacon makes everything better, so how bad could this be, even if it WAS Brussels sprouts? A co-worker ordered it and let me taste it and it was unbelievable, although the drizzle on top was a little too sweet for my taste. 

Since then I’ve been trying to get my hands on a recipe that comes even remotely close to duplicating the complexity of this fabulous creation. No go. Everyone’s recipe for Brussels sprouts with bacon simply reads, “Brussels Sprouts, bacon, salt and pepper.” You’re kidding, right? And this from celebrity chefs you’d really expect more from.  Other recipes add just the weirdest ingredients.
Realizing I was on my own, I got out a book of mine called the “Flavor Bible” and looked up Brussels sprouts. Under the heading, a list of all the flavors that go well with Brussels sprouts. I wrote down the ingredients I thought would marry well and went into the kitchen.


What resulted from this creative process was a dish that I not only went back for seconds for, I went back for THIRDS!! I was stuffed!  It was all I wanted for dinner that night. “To die for” good, it was. I am planning on bringing it with me to Thanksgiving. I hope the family likes it, too.


Brussels Sprouts with Bacon, etc.

1 stalk Brussels sprouts, cut larger ones in quarters,
smaller ones in half, tiny ones you can leave whole
1 pound bacon, cut into lardons (little
bite-size strips, see photo, right)
1 red onion, sliced into thin slices
Leaves from several sprigs of fresh thyme
(I use lemon thyme from my garden)
1 basket mushrooms, chopped
3 cloves garlic, minced
½ cup hazelnuts, cut in half
Salt and pepper to taste
Honey mustard thinned out with a little mayo

Bring a pot of water to a boil and drop in the Brussels sprouts. Cook for about 5-8 minutes. They should be slightly undercooked since they will continue cooking later. Drain.


Heat a large non-stick sauté pan and when hot, add bacon pieces. Brown for 5-8 minutes. Add onion slices and brown. Add thyme leaves. Add Brussels sprouts and brown those as well. Add mushrooms and sauté for about 5 minutes.

Now you can add the remaining ingredients in rapid succession, since all you need to do is basically heat them (the garlic and hazelnuts). Cover and allow to simmer for 5-10 minutes until everything is hot. Add salt and pepper and give it another good stir.

Meanwhile, blend a little honey mustard with a little mayo. If you have a squeeze bottle, put it in there.

Dish up a generous serving (trust me, you’ll want seconds, so just put enough on your plate now) and before serving, drizzle a little bit of the mustard/mayo sauce over the mound. Nice alongside roasted chicken. Or do like I did and forget the chicken - just eat seconds, or (ahem) thirds, of this. YUM!


Friday, November 15, 2013

Cornbread Stuffed Squash

Turkey isn't the only thing great for stuffing. So are squashes. I recently came across a recipe for squash stuffed with cornbread and it sounded good, so I tried it last night. Just the thing for a cool evening.

In fact, the stuffing was so good, I could have eaten it just by itself. The combination of the onion, celery, sage and pecans with the cornbread worked well and it was really delicious.

Roasted Winter Squash with Cornbread Stuffing

1 small to medium winter squash (acorn, butternut, or pumpkin), about 1 1/4 lbs.
2 Tbsp. extra virgin olive oil
1/4 cup dried cranberries (I omitted these)
Kabocha Pumpkin
1/4 cup golden raisins
1/3 cup chopped onion
1/4 cup chopped celery
1 Tbsp. chopped fresh sage
1 Tbsp. minced garlic
1/2 cup reduced-sodium vegetable or chicken broth
3 Tbsp. chopped pecans
1 1/2 cups cooked and crumbled cornbread
1 Tbsp. chopped fresh parsley
1/2 tsp. salt
Freshly ground black pepper

Preheat oven to 400F.

Cut squash in half, scoop out seeds and brush cut sides with olive oil. Place cut sides down on a baking sheet lined with foil. Roast 25 minutes or until tender.

Soak dried fruit in hot water 10 min. Drain and discard liquid. Set aside.

Heat remaining oil in a medium skillet over medium high heat. Add onion, celery, sage and garlic; saute 5 minutes. Combine drained fruit, onion mixture, broth (start with 1/4 cup and see if more is needed), pecans, cornbread, parsley, salt and pepper.

Place cornbread mixture into each squash half. return squash to oven and bake about 20 min, until stuffing is thoroughly heated and golden brown on top.

Serves 2.

Recipe by Brian Morris, courtesy of relishmag.com.

Friday, November 8, 2013

Light as Air

Julia Child said it best: "The souffle is the egg at its most magnificent. How glorious it is when borne to the table, its head rising dramatically out of its dish, and swaying voluptuously as it is set down." Wow!

If the very suggestion of making a souffle makes you shudder, I would ask that you reconsider and try it sometime. I've made a few and seriously think they are not difficult.

I once intended to make a spinach and cheese souffle only to find that my spinach was beyond its expiration date. Scrambling through the rest of my veggie bins, I discovered zucchini I had purchased at the farmer's market so I used it instead, grating it so it would require no pre-cooking. It worked out just fine and was so delicious. It was actually easier, I think. With spinach, you have to make sure to REALLY squeeze out all the water from it so you don't end up with a soggy soufflé. You don't have that same problem with zucchini. But, should you wish to use to spinach instead, just substitute "spinach" in the recipe below where it lists "zucchini".

My souffle dish is small because I usually only feed 2 people, and the recipe I use is for a slightly larger dish, but instead of adjusting the recipe down for a small quantity, I leave it as is and just put on a collar, allowing it to "puff up" well past the top of the dish. This photo shows what a collar should look like.

You can use foil but I find parchment or wax paper work well. I just wrap a long piece around the dish and tape it in place, making sure to butter the inside (melted butter smears so much easier), so that as the souffle rises, it won't stick to the collar and be ripped off later when the collar is removed. The collar should stick up out of the dish by about 3-4". Dust the paper after buttering it with a little grated Parmesan cheese. This helps it slide up the sides.


A souffle is a wonderful thing to make for lunch or for dinner. Serve it alongside a simple salad with vinaigrette dressing and you have a meal. I adapted Julia Child's recipe from her book Kitchen Wisdom.
 
Here, my final product. Let's hurry and eat - it's deflating!

Zucchini Souffle

For the vegetable:
1 Tbsp. minced shallots or green onion
1Tbsp. butter
3/4 cup grated fresh zucchini
1/4 tsp. salt
5 egg whites
a pinch of salt
1/3 to 1/2 cup grated Swiss cheese

For the soufflé sauce base:
1 tsp. butter
1 Tbsp. grated Swiss or Parmesan cheese
3 Tbsp. butter
3 Tbsp. flour (use rice flour or other light flour if you're avoiding gluten)
1 cup boiling milk
1/2 tsp. salt
1/8 tsp. cayenne
pinch of nutmeg
4 egg yolks

Directions:
Butter the soufflé mold and collar and sprinkle with Parmesan. Preheat oven to 400 degrees. Measure out your other ingredients.

Cook the shallots or onions for a moment in the butter. Add zucchini and salt, and stir over moderately high heat for several minutes to evaporate as much moisture as possible from the zucchini. Remove from heat.

Prepare the soufflé sauce base: Melt the butter in the saucepan. Stir in the flour with a wooden spatula or spoon and cook over moderate heat until butter and flour foam together for two minutes without browning. Remove from heat; when mixture has stopped bubbling, pour in all the boiling milk at once. Beat vigorously with a wire whip until blended. Beat in the seasonings. Return to moderately high heat and boil, stirring with the wire whip, for one minute. Sauce will be very thick.

Remove from heat. Immediately start to separate the eggs. Drop the white into the egg white bowl, and the yolk into the center of the hot sauce. Beat the yolk into the sauce with the wire whip. Continue in the same manner with the rest of the eggs.

After the egg yolks have been beaten in, stir in the zucchini. Correct seasoning.

Beat the egg whites and salt until stiff. Stir one fourth of them into the sauce. Stir in all but a tablespoon of the cheese. Fold in the rest of the egg whites and turn mixture into prepared mold. Sprinkle with remaining cheese and set on a rack in the middle level of preheated oven. Turn heat down to 375 degrees and bake for 2S to 30 minutes.

VARIATIONS:

Ham
1/3 cup finely minced cooked ham
Cook the ham with the butter and shallots for a moment before adding the veg.

Mushrooms
¼ lb. finely minced mushrooms
1 Tb butter
Salt and pepper
A handful at a time, twist the mushrooms in the corner of a towel to extract their juice. Sauté in the butter for 5 minutes or so until the mushroom pieces begin to separate from one another. Season to taste. Stir them into the soufflé mixture with the spinach.

Other vegetable soufflés
These are all done in exactly the same manner as the zucchini soufflé. Use ¾ cup of cooked vegetables, finely diced or puréed, such as mushrooms, broccoli, artichoke hearts, or asparagus tips.

Friday, November 1, 2013

Real women eat quiche

Comfort food. Everyone has their favorite. That meal that takes you back to your childhood, that eases away the tensions of the day, that soothes the soul. What comes to mind for you? Meatloaf and mashed potatoes, perhaps? A hearty stew? Fried chicken? Mac n'cheese?

For me, it usually means something eggy and cheesy, so I like quiche - a rich and creamy concoction of milk, cheese and eggs and whatever vegetable happens to be around. 

Although quiche is now a classic dish of French cuisine, it actually originated in Germany, in the medieval kingdom of Lothringen, when it was under German rule, and which the French later renamed Lorraine. The word 'quiche' is from the German 'Kuchen', meaning cake.

The original Quiche Lorraine was an open pie with a filling consisting of eggs and cream with smoked bacon. It was only later that cheese was added to it. Add onions and you have quiche Alsacienne. (In Germany, there is a wonderful dish called Zwiebelkuchen or "onion cake", that I adore). Though the bottom crust was originally made from bread dough, it has long since evolved into a short-crust or puff pastry crust. Though fillings vary, they are all variations on the same theme: a fantastically flaky buttery crust holding in place a custard of eggs and cheese. Comfort food at its finest.

Swiss Chard and Bacon Quiche

1 Quiche crust (see below)
2 shallots, minced
1 clove garlic, minced
4 oz. bacon, cut into lardons
1 1/2 lbs. Swiss chard, ribs removed
3 eggs
1 cup creme fraiche or heavy cream and sour cream combined
salt and freshly ground black pepper
4  oz. Gruyere or Swiss cheese, grated
 

Preheat oven to 350 F.

Fry the bacon. Remove from pan. Saute shallots in bacon fat (or remove bacon fat and add a little olive oil or butter) until translucent. Add the garlic and saute for 1 minute. Remove to the plate with the bacon. Divide the chard leaves from the ribs: chop the ribs quite small and shred the leaves. First, fry the ribs in the bacon fat until tender. Then, add the chard leaves to the pan, cover and wilt, about 4-5 minutes.

Beat the eggs together with the creme fraiche and season with salt and pepper.

Combine the shallots, bacon, chard stems and leaves. Fill the quiche crust with this mixture, then sprinkle with the grated cheese, and pour over the custard (egg and cream). Bake for 50-60 minutes until quiche is set and browned. Cool and serve at room temperature.

Crust:
In a bowl, combine 1 1/2 cups all-purpose flour and 1/4 tsp. salt. Add 1/2 cup (1/4 lb.) plus 2 Tbsp. butter, cut into chunks; mix to coat with flour. With your fingers or pastry blender, rub or cut the butter into the flour mixture until it resembles fine crumbs. Add 1 egg and stir with a fork until dough holds together. Shape dough into a ball. On a floured board, roll out dough and fit into a 10-inch quiche pan or pie pan. Make dough flush with top rim, folding excess dough down against pastry-lined side and pressing firmly in place. Flute edge decoratively. If made ahead, cover and refrigerate for up to 3 days. Bring to room temperature before using. Makes enough for 1 quiche.

Excellent served with a side salad and a glass of white wine. 

Print Friendly