Monday, December 30, 2013

Happy New Year!!!


The New Year is a time for new beginnings, a clean slate, celebrating the old and welcoming in the new. And what better way to celebrate than with some food and a few drinks? Nothing brings people together like a delicious dish. But this particular holiday calls for meals that bring luck, health and prosperity to the upcoming year. And not all foods are created equal when it comes to ringing in the New Year. Every culture has a different dish they consume for New Year's, but they all share similarities, like hoping for happiness and prosperity in the future.
 
Greens

Cabbage, kale, chard and collards are all cooked on New Year's because of their vibrant green hue. They resemble money, therefore symbolizing good fortune in the coming year. It's believed that the more you eat, the healthier and prosperous you will be. These greens are enjoyed in a variety of ways across the globe. The Danish like to sprinkle stewed kale with cinnamon and sugar, while the Germans enjoy sour cabbage, otherwise known as sauerkraut.

Round fruits

Resembling money or coins, for their round shape, are fruits like oranges and
clementines. In the U.S., people eat these by the slice, but how many slices they eat is the important part. Americans snack on 12 slices, which represent the number of months in a year. Other countries, like the Philippines, eat 13 slices because the number is said to be lucky.

Cornbread

In the Southern United States, cornbread can be found on the plates of many on New Year's. Its warm yellow shade represents the color of gold. Some even add kernels of corn to their bread to symbolize gold nuggets for even more prosperity in the coming year.

Champagne

It may not be found on a plate, but every year, people pour a
glass of Champagne and toast to a wonderful year as well as a prosperous future. Champagne, otherwise known as sparkling wine, is loved for its bubbly nature. It was first made from grapes in the region of Champagne, France. Hugh Capet, King of France in 989, drank the bubbly at his coronation banquets, which intrigued monarchs. Champagne was also the drink of choice for King Louis XIV.

Tips for serving Champagne:

  • Serve Champagne chilled, between 39 and 48 degrees Fahrenheit. You can store the beverage in a wine refrigerator or fill a wine bucket with water and ice and give the bottle about 30 minutes to chill to perfection.
  • Always leave the bottle corked until you're ready to serve.
  • Serve in long-stemmed flutes, which helps the flow of bubbles and even makes the aroma of the beverage stronger.
  • Never chill the flutes - leave them at room temperature.
Here's to a happy and healthy New Year for all!

Friday, December 27, 2013

Heavenly Root Vegetable Puree


Vegetable purees are great comfort food. They are a luxurious way to serve vegetables and offer unexpected texture to a plate. They add contrast and interest, and are a great use of leftovers.

I love purees. I've always thought they make a plate look "special" when I've been served them in restaurants.

baby food
Mashed potatoes are probably the first thing you'd think of when you hear "vegetable puree". That certainly is one type of puree to make, but there are so many more combinations of vegetables that you can use. 

And no, vegetable purees are NOT just grown-up versions of baby food.  Although I think kids would love them as much as the adults. The best thing about them is that they are really simple to make. And if you have young kids, it might be fun to get them to help you make one.

Basically, purees need a "binder" of fat and ideally something starchy or absorbent to keep them together, else they can separate into solids and liquids on your plate. Cream, half and half, milk, even bread or tofu work well as binders. Pureed veggies need to be properly cooked, and well seasoned, and of course pureed, and that's it.

Here's how:

Preparing a vegetable puree:
Peel all vegetables first. Don't undercook but definitely don't overcook your vegetables. Boiling and steaming are best but you can also saute, roast or grill which impart deep flavor and color and ideally cause more water evaporation from the vegetables (which you want). Once properly cooked, you're ready to puree.

Different ways to puree:
Fork or potato masher - especially with soft vegetables
Food mill (if you have one) - offers a nice fluffy texture
Blender is easiest - ultra smooth consistency
Food processor - chunkier, rustic
Immersion blender - out of the question - it needs more liquid to work

If using a machine, add binder or fat first, then the veg, cover and pulse until desired consistency is reached, adding more liquid if needed (the broth that the vegetables were cooked in is best, as it obviously imparts the same flavor as the vegetable you are using).

Seasoning the vegetables:
You'll want to do so while cooking so the flavors seep into the vegetables, that is, if you are roasting, grilling or sauteeing, else add later.

The best veggies to puree are: broccoli, carrots, cauliflower, corn, eggplant, peppers, root vegetables, shell peas, spinach, starchy potatoes, winter squash. The worst are the really high-water content ones.

Here are some possible combinations, listed as:
Vegetable / Binder / Fat / Seasoning / Garnish

Broccoli / ricotta cheese / extra virgin olive oil / nutmeg / grated Parmesan
Butternut Squash / coconut milk / grapeseed oil / curry / toasted shredded coconut
Cauliflower / soaked croutons / extra virgin olive oil (EVOO) / garlic / pesto
Eggplant / tofu / sesame oil / miso / chopped scallions
Eggplant / roasted garlic / EVOO / Middle Eastern spices / chopped parsley
Turnips / sour cream / EVOO or butter / minced red onion / chopped parsley
But here is my all-time favorite:

Heavenly Root Vegetable Puree

Saute either 1 large or 2 small/medium chopped onions in a little bit of olive oil until carmelized (this takes about 30-45 minutes).

Meanwhile, steam 2 sweet potatoes, 2 turnips and a butternut squash together, having chopped these items into similarly-sized chunks so they cook evenly.

When fully cooked, mash the veggies however you wish (I puree them in a blender or food processor depending on mood). Add 1/2 cup unsweetened almond milk (or milk or cream or whatever dairy you have), sea salt, the carmelized onions, some softened butter, and Herbamare* seasoning to taste.

You will not have much left over, I guarantee it.

* Herbamare is a lovely organic herb seasoning salt made in France and contains sea salt, celery leaves, leek, cress, onion, chives, parsley, lovage, garlic, basil, marjoram, rosemary, thyme and kelp. It's really delicious on potatoes and eggs. I find it at my local health food store.

Friday, December 20, 2013

Mulled Wine

Mulled wine is a traditional European beverage served hot or warm during winter, especially around Christmas time.  As the weather cools down in the northern hemisphere, it is particularly enjoyable now.

I grew up with this drink and therefore associate it with the holidays. In fact, there is no other time of year in which I even want it. It just says Christmas. I always thought it gives you a warm glow from the inside out, which is so appropriate for the holidays. So it’s not surprising that in German, mulled wine is called Glühwein ("glow-wine," either from the hot irons once used for mulling, or from how it makes you feel)!

Glühwein is popular in all the German-speaking countries and in the French region of Alsace. At this time of year, the Weihnachtsmarkt, or Christmas market, is open and often one enjoys a steaming hot mug of it as one visits the food and craft booths of the market.

The drink is usually prepared from red wine, heated and spiced with cinnamon sticks, cloves, star aniseed, citrus, sugar and at times vanilla pods. It is sometimes drunk mit Schuss (with a shot), which means that rum or some other liquor has been added.

Another popular variant of Glühwein is the Feuerzangenbowle. It shares the same recipe, however here a rum-soaked sugarloaf is set on fire and allowed to drip into the wine.

In England, mulled wine is typically sweeter than in other European countries.

In France, vin chaud ("hot wine") typically consists of cheap red wine mixed with sugar, cinnamon, and lemon. They don’t like theirs too sweet.

In the south and southeast of Brazil, where a large amount of European descendants live, it is called quentão or vinho quente ("hot wine"). It is typically made with red wine, cachaça (rum), cinnamon sticks and cloves. It is served as part of the Festa Junina, celebrated during winter in the month of June.

Glogg is the term used for mulled wine in the Nordic countries: Norway, Denmark, Sweden, Iceland, Estonia and Finland.
Versions of mulled wine can also be found in Bosnia and Herzegovina, Bulgaria, Croatia, the Czech Republic, Hungary, Italy, Latvia, Macedonia, Moldova, the Netherlands, Poland, Romania, Russia, Slovenia, Serbia, and Turkey.

In Quebec, Canada, red wine is mixed with maple syrup and hard alcohol and heated. The drink is called Caribou and is very popular during the Quebec Winter Carnival.

Clearly, mulled wine recipes around the world are variations on the same theme. An inexpensive red wine, sugar or honey added to sweeten it, and then spiced with anything from peppercorns to cloves, cinnamon and nutmeg, and finally fruit: sometimes apples and nearly always citrus fruits, such as lemon or oranges.
You can make this warm, soothing drink at home very easily for yourself, your family and friends this holiday season, as I plan to do. There’s nothing like it to put you in the Christmas spirit!

Mulled Wine

Ingredients:

3/4 cup water
3/4 cup sugar
1 cinnamon stick
1 orange
10 whole cloves
1 (750 milliliter) bottle red wine

Directions:

In a saucepan, combine the water, sugar, and cinnamon stick. Bring to a boil, reduce heat, and simmer. Cut the orange in half, and squeeze the juice into the simmering water. Push the cloves into the outside of the orange peel, and place peel in the simmering water. Continue simmering for 30 minutes, until thick and syrupy.

Pout in the wine, and heat until steaming but not simmering. Remove the clove-studded orange halves.

Serve hot in mugs or clear glasses that have been preheated in warm water (cold glasses might break).

Makes six 4 oz servings.

I also wanted to list Jamie Oliver’s recipe, which has a few additional ingredients and sounds really good. http://www.jamieoliver.com/recipes/recipe/jamie-s-mulled-wine

Friday, December 13, 2013

Fall for Mushrooms

Mushrooms. Their earthy fragrance and taste makes me think of the forest after rainfall. Their meaty texture is often used to provide a hearty, deep flavor to foods. Great alone, simply sauteed, or used as a base for soups and sauces, there are many varieties of mushroom to choose from to enhance our dishes.

Button mushrooms are the most common, but you can also find crimini, dried porcini and portobellos in most supermarkets and if you have never tried these, they are a real treat.
Earthy and very fragrant. 

Other cultivated species used a lot in Asian cuisine include shiitake, maitake, oyster, and enoki (the majority of mushrooms are grown in Asia, by the way). Of course there are truffles, "hunted" by specially trained dogs or even pigs, in the forest. A medium sized basket can bring the truffle hunter upwards of $10,000!
Though often eaten raw in salads, I think mushrooms are best cooked. My favorite way to enjoy them as an appetizer is to simply saute small mushrooms in garlic and butter, then sprinkle freshly chopped parsley and salt and pepper over them, or to take larger "stuffing mushrooms" and fill them with grated Jack cheese, garlic powder, parsley, salt and pepper and grill them for a few minutes on a stove top grill or bake them in the oven with a little bit of a sprinkling of bread crumbs on top.

For mushroom meals, there are a couple of delicious recipes I wanted to share. If you try them, please let me know what you think by leaving a comment below.

Mushrooms with Paprika and Sour Cream
 
Chanterelle Mushrooms
1 1/2 Tbsp. each butter and olive oil
1 bunch scallions, including some of the greens, chopped
1 pound large white mushrooms, thickly sliced or quartered*
salt and freshly milled black pepper
1 tsp. flour
1 Tbsp. sweet Hungarian paprika
1/2 cup mushroom stock (or chicken stock or beef stock if you prefer)
1/2 cup sour cream or creme fraiche

* My mother makes a version of this using Chanterelle mushrooms. If you can find them in your supermarket, grab some for a little different flavor.  Recipe calls for white mushrooms but I actually used a combination of shiitake and crimini (Italian brown) mushrooms for a little interest.

Heat the butter and oil in a wide skillet over high heat. Add the scallions and mushrooms and saute until the mushrooms begin to color, about 6 min. Lower the heat and season with 3/4 tsp. salt and pepper to taste. Sprinkle the flour and paprika over the mushrooms, add the stock, and simmer, covered, for 3-4 minutes. Stir in the sour cream, and gently heat through, but do not boil. Serve over wide flat egg noodles, wild rice or barley.

Serves 3-4.
_____________________________________________________________

The following dish is absolutely terrific. I have prepared it often. You will wish you had made more!

Pollo alla Cacciatora (Hunter's Chicken)

1 cup dried porcini mushrooms
2 Tbsp. olive oil
1 Tbsp. butter
4 chicken pieces, on the bone, skinned
1 large onion, thinly sliced
1 can (14 oz.) chopped tomatoes
2/3 cup red wine
1 garlic clove, crushed
leaves of 1 sprig fresh rosemary, finely chopped
1 3/4 cups fresh field mushrooms, thinly sliced
salt and freshly ground black pepper
fresh rosemary sprigs for garnish

Put porcini in a bowl, add 1 cup warm water and soak for 20-30 minutes to rehydrate them. Remove from the water and squeeze the porcini over the bowl, strain the liquid and reserve. Finely chop them.
 
Heat the oil and butter in a large flameproof casserole until foaming. Add the chicken and saute over medium heat for 5 minutes or until golden. Remove and drain on paper towels. Add the onion and chopped mushrooms to the pan. Cook gently, stirring frequently, for about 3 minutes, until the onion has softened but not browned. Stir in the tomatoes, wine and reserved mushroom soaking liquid, then the garlic and rosemary, salt and pepper to taste. Bring to a boil, stirring the entire time. Return chicken to the pan and coat with the sauce. Cover and simmer gently for 25 minutes. Add the fresh mushrooms and stir well to mix into the sauce. Simmer for 15 min. more or until chicken is tender. Taste for seasoning. Serve hot with mashed potatoes or polenta. Garnish with rosemary.

Serves 4.

Friday, December 6, 2013

Tools of the Trade: Cookbooks

Sometimes there is nothing more relaxing for me than to sit down with a cookbook and just read. 

A cookbook is perhaps one of the most important tools a cook can have. More than just a collection of recipes that someone decided to share with us, a cookbook should speak to us and inspire us in some way; either to cook foods we normally wouldn't, or to use a new technique, or use ingredients we may not have otherwise thought to.

The earliest collection of recipes that has survived in Europe is the De re coquinaria, written in Latin. First compiled some time in the First Century, it recorded a mixture of Greek and Roman cuisines but with few details on preparation and cooking. After a long interval, recipe books started to appear in the late 13th Century, in Europe as well as in the Middle East and China. Amazingly, about a hundred survived (though mostly fragmentary) from the age before printing. Most "cookbooks" at that time provided not just recipes but overall instruction for both kitchen technique and household management. In fact, the first cookbook published in America was called "The Compleat Housewife", written by Eliza Smith, an instructional guide to not only cooking but preparing medicinals and home cleaning solutions. It was originally published in London in 1727 and was later modified for the American audience and published here in 1742 where it quickly became a best seller.

Cookbooks are as varied as they come: some are just beautiful to look at, with lovely, mouthwatering photos of food and places (one celebrity chef has sarcastically referred to this as "food porn"); others are instructional, such as Julia Child's "Mastering the Art", detailing step-by-step directions on how to truss a chicken, for instance; others are encyclopedias which explain the ingredients and how best to use and prepare them and perhaps offer some history about where they came from. Celebrity chefs are putting out their own collections of recipes based on their shows. And then there are the specialized cookbooks that focus on just soups, for instance, or just meat, or cooking with chocolate. So, with this vast array of cookbooks to choose from, how do we pick those that we want to include in our collection?

The best cookbooks are simply those that get used. The one with the oil splatters and food stains. In my French cookbook, for example, the page on quiches has butter stains on it because it has been a reliable recipe for me for over 20 years! Some people's cookbooks have been so often used that they are held together with rubber bands. These are the cookbooks we cherish and will pass along to our families. Those that don't capture us should be given away to others or donated to the library. We should keep only those that really inspire us and we should get more of them. It's easy to get stuck in a cooking "rut" where we fall back on the dishes we are comfortable making. It's one thing to make that recipe over and over again because it's great, but do we venture out and try new things? Do we go beyond our comfort zones and risk making something we've never prepared before?

A new cookbook can provide just the inspiration our cooking needs, to steer us in a new direction. The next one I buy will likely be one that inspires me to use seasonal foods and is organized by time of year. So far, I'm really liking Local Flavors by Deborah Madison. I have two other books by this author that I have really enjoyed.

I know there’s always the internet to go to, but for some of us, we like the feel of an actual book in our hands. In that case, dont forget your library if you don’t want to spend any money. There is a book on veggies there that I check out several times a year! I’m always finding new recipes to make from it.

Friday, November 29, 2013

Fruit Crisps

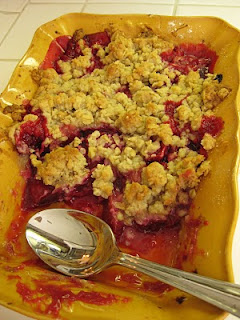
One of my favorite desserts is a Fruit Crisp. Living in California, there are so many fruits available nearly year round to choose from: nectarines, peaches, cherries, blueberries, raspberries, plums, apples.....and in any combination. I love these desserts because they are a great way to enjoy fruit, and are so easy to make. They are simply fruit plus a streusel topping, then baked until the fruit is bubbly and the topping is a nice golden brown. What could be better?

There are a few variations of the "crisp". A "crumble" is very similar while a "cobbler" uses a flour-based covering over the fruit. I prefer crisps and crumbles because of the addition of nuts and oats. I think those compliment the fruit the best.  Flour just seems to weigh it all down.

I once watched an Ina Garten episode on the Food Network where she made a "Plum Crumble" that sounded divine. I've made it a few times, sometimes varying the topping a bit. I cut the recipe in half because there are only 2 of us here. This is the full recipe. At this time of year you could substitute apples if you wish, depending on where you live. We can still get plums here in California. Our apples aren't quite ready yet.

Plum Crumble

Filling:
3 lbs. plums
1 1/2 cups brown sugar
1/4 cup flour* (this helps thicken the sauce)
6 Tbsp. cassis (or any liqueur that compliments the fruit). Sub Calvados if you're using apples; Kirsch if you're using cherries; etc.

Mix together and put into a 12" x 8" baking dish.

Topping:
1 1/2 cups flour**
3/4 cup sugar
3/4 cup brown sugar
1/2 tsp. salt
1 cup oats
1/2 cup walnuts, roughly chopped
2 sticks cold butter, diced

Mix the topping ingredients in a food processor until crumbly.

Cover all the fruit with the topping, making clumps, otherwise it might dissolve into the fruit.

Bake 30 minutes at 375 F until topping is golden brown.

Recipe courtesy of Ina Garten's Barefoot Contessa.

*If you're on a gluten free eating plan, substitute 1 Tbsp. corn starch (preferably organic, as corn is largely genetically modified in America) by mixing it in with the cassis.

**For a gluten-free option, you can use tapioca flour here.

Friday, November 22, 2013

How not to hate Brussels Sprouts

I always hated Brussels sprouts, mostly because of the way they smell when they cook. They have this acrid, malodorous scent that I find simply disgusting.  Then one day, my sister tells me she roasts them and that parboiling them for a few minutes beforehand in boiling water helps with that nasty smell. Since I love anything roasted I tried it last year and made them for Thanksgiving. They were pretty good and since then I’ve made Brussels sprouts from time to time trying to love them. But it wasn’t until I tried them from a food truck that I thought, wow, these are incredible!

Nearly every Thursday, a food truck comes to my office building during lunch. Being a foodie, I usually go online and check the menu of the truck in question. Usually it's the usual, tacos and burgers, so I pass, but one day I saw this dish, Brussels Sprouts with Bacon, and thought, mmhhhh, that sounds pretty good. I mean, really. Bacon makes everything better, so how bad could this be, even if it WAS Brussels sprouts? A co-worker ordered it and let me taste it and it was unbelievable, although the drizzle on top was a little too sweet for my taste. 

Since then I’ve been trying to get my hands on a recipe that comes even remotely close to duplicating the complexity of this fabulous creation. No go. Everyone’s recipe for Brussels sprouts with bacon simply reads, “Brussels Sprouts, bacon, salt and pepper.” You’re kidding, right? And this from celebrity chefs you’d really expect more from.  Other recipes add just the weirdest ingredients.
Realizing I was on my own, I got out a book of mine called the “Flavor Bible” and looked up Brussels sprouts. Under the heading, a list of all the flavors that go well with Brussels sprouts. I wrote down the ingredients I thought would marry well and went into the kitchen.


What resulted from this creative process was a dish that I not only went back for seconds for, I went back for THIRDS!! I was stuffed!  It was all I wanted for dinner that night. “To die for” good, it was. I am planning on bringing it with me to Thanksgiving. I hope the family likes it, too.


Brussels Sprouts with Bacon, etc.

1 stalk Brussels sprouts, cut larger ones in quarters,
smaller ones in half, tiny ones you can leave whole
1 pound bacon, cut into lardons (little
bite-size strips, see photo, right)
1 red onion, sliced into thin slices
Leaves from several sprigs of fresh thyme
(I use lemon thyme from my garden)
1 basket mushrooms, chopped
3 cloves garlic, minced
½ cup hazelnuts, cut in half
Salt and pepper to taste
Honey mustard thinned out with a little mayo

Bring a pot of water to a boil and drop in the Brussels sprouts. Cook for about 5-8 minutes. They should be slightly undercooked since they will continue cooking later. Drain.


Heat a large non-stick sauté pan and when hot, add bacon pieces. Brown for 5-8 minutes. Add onion slices and brown. Add thyme leaves. Add Brussels sprouts and brown those as well. Add mushrooms and sauté for about 5 minutes.

Now you can add the remaining ingredients in rapid succession, since all you need to do is basically heat them (the garlic and hazelnuts). Cover and allow to simmer for 5-10 minutes until everything is hot. Add salt and pepper and give it another good stir.

Meanwhile, blend a little honey mustard with a little mayo. If you have a squeeze bottle, put it in there.

Dish up a generous serving (trust me, you’ll want seconds, so just put enough on your plate now) and before serving, drizzle a little bit of the mustard/mayo sauce over the mound. Nice alongside roasted chicken. Or do like I did and forget the chicken - just eat seconds, or (ahem) thirds, of this. YUM!


Friday, November 15, 2013

Cornbread Stuffed Squash

Turkey isn't the only thing great for stuffing. So are squashes. I recently came across a recipe for squash stuffed with cornbread and it sounded good, so I tried it last night. Just the thing for a cool evening.

In fact, the stuffing was so good, I could have eaten it just by itself. The combination of the onion, celery, sage and pecans with the cornbread worked well and it was really delicious.

Roasted Winter Squash with Cornbread Stuffing

1 small to medium winter squash (acorn, butternut, or pumpkin), about 1 1/4 lbs.
2 Tbsp. extra virgin olive oil
1/4 cup dried cranberries (I omitted these)
Kabocha Pumpkin
1/4 cup golden raisins
1/3 cup chopped onion
1/4 cup chopped celery
1 Tbsp. chopped fresh sage
1 Tbsp. minced garlic
1/2 cup reduced-sodium vegetable or chicken broth
3 Tbsp. chopped pecans
1 1/2 cups cooked and crumbled cornbread
1 Tbsp. chopped fresh parsley
1/2 tsp. salt
Freshly ground black pepper

Preheat oven to 400F.

Cut squash in half, scoop out seeds and brush cut sides with olive oil. Place cut sides down on a baking sheet lined with foil. Roast 25 minutes or until tender.

Soak dried fruit in hot water 10 min. Drain and discard liquid. Set aside.

Heat remaining oil in a medium skillet over medium high heat. Add onion, celery, sage and garlic; saute 5 minutes. Combine drained fruit, onion mixture, broth (start with 1/4 cup and see if more is needed), pecans, cornbread, parsley, salt and pepper.

Place cornbread mixture into each squash half. return squash to oven and bake about 20 min, until stuffing is thoroughly heated and golden brown on top.

Serves 2.

Recipe by Brian Morris, courtesy of relishmag.com.

Friday, November 8, 2013

Light as Air

Julia Child said it best: "The souffle is the egg at its most magnificent. How glorious it is when borne to the table, its head rising dramatically out of its dish, and swaying voluptuously as it is set down." Wow!

If the very suggestion of making a souffle makes you shudder, I would ask that you reconsider and try it sometime. I've made a few and seriously think they are not difficult.

I once intended to make a spinach and cheese souffle only to find that my spinach was beyond its expiration date. Scrambling through the rest of my veggie bins, I discovered zucchini I had purchased at the farmer's market so I used it instead, grating it so it would require no pre-cooking. It worked out just fine and was so delicious. It was actually easier, I think. With spinach, you have to make sure to REALLY squeeze out all the water from it so you don't end up with a soggy soufflé. You don't have that same problem with zucchini. But, should you wish to use to spinach instead, just substitute "spinach" in the recipe below where it lists "zucchini".

My souffle dish is small because I usually only feed 2 people, and the recipe I use is for a slightly larger dish, but instead of adjusting the recipe down for a small quantity, I leave it as is and just put on a collar, allowing it to "puff up" well past the top of the dish. This photo shows what a collar should look like.

You can use foil but I find parchment or wax paper work well. I just wrap a long piece around the dish and tape it in place, making sure to butter the inside (melted butter smears so much easier), so that as the souffle rises, it won't stick to the collar and be ripped off later when the collar is removed. The collar should stick up out of the dish by about 3-4". Dust the paper after buttering it with a little grated Parmesan cheese. This helps it slide up the sides.


A souffle is a wonderful thing to make for lunch or for dinner. Serve it alongside a simple salad with vinaigrette dressing and you have a meal. I adapted Julia Child's recipe from her book Kitchen Wisdom.
 
Here, my final product. Let's hurry and eat - it's deflating!

Zucchini Souffle

For the vegetable:
1 Tbsp. minced shallots or green onion
1Tbsp. butter
3/4 cup grated fresh zucchini
1/4 tsp. salt
5 egg whites
a pinch of salt
1/3 to 1/2 cup grated Swiss cheese

For the soufflé sauce base:
1 tsp. butter
1 Tbsp. grated Swiss or Parmesan cheese
3 Tbsp. butter
3 Tbsp. flour (use rice flour or other light flour if you're avoiding gluten)
1 cup boiling milk
1/2 tsp. salt
1/8 tsp. cayenne
pinch of nutmeg
4 egg yolks

Directions:
Butter the soufflé mold and collar and sprinkle with Parmesan. Preheat oven to 400 degrees. Measure out your other ingredients.

Cook the shallots or onions for a moment in the butter. Add zucchini and salt, and stir over moderately high heat for several minutes to evaporate as much moisture as possible from the zucchini. Remove from heat.

Prepare the soufflé sauce base: Melt the butter in the saucepan. Stir in the flour with a wooden spatula or spoon and cook over moderate heat until butter and flour foam together for two minutes without browning. Remove from heat; when mixture has stopped bubbling, pour in all the boiling milk at once. Beat vigorously with a wire whip until blended. Beat in the seasonings. Return to moderately high heat and boil, stirring with the wire whip, for one minute. Sauce will be very thick.

Remove from heat. Immediately start to separate the eggs. Drop the white into the egg white bowl, and the yolk into the center of the hot sauce. Beat the yolk into the sauce with the wire whip. Continue in the same manner with the rest of the eggs.

After the egg yolks have been beaten in, stir in the zucchini. Correct seasoning.

Beat the egg whites and salt until stiff. Stir one fourth of them into the sauce. Stir in all but a tablespoon of the cheese. Fold in the rest of the egg whites and turn mixture into prepared mold. Sprinkle with remaining cheese and set on a rack in the middle level of preheated oven. Turn heat down to 375 degrees and bake for 2S to 30 minutes.

VARIATIONS:

Ham
1/3 cup finely minced cooked ham
Cook the ham with the butter and shallots for a moment before adding the veg.

Mushrooms
¼ lb. finely minced mushrooms
1 Tb butter
Salt and pepper
A handful at a time, twist the mushrooms in the corner of a towel to extract their juice. Sauté in the butter for 5 minutes or so until the mushroom pieces begin to separate from one another. Season to taste. Stir them into the soufflé mixture with the spinach.

Other vegetable soufflés
These are all done in exactly the same manner as the zucchini soufflé. Use ¾ cup of cooked vegetables, finely diced or puréed, such as mushrooms, broccoli, artichoke hearts, or asparagus tips.

Friday, November 1, 2013

Real women eat quiche

Comfort food. Everyone has their favorite. That meal that takes you back to your childhood, that eases away the tensions of the day, that soothes the soul. What comes to mind for you? Meatloaf and mashed potatoes, perhaps? A hearty stew? Fried chicken? Mac n'cheese?

For me, it usually means something eggy and cheesy, so I like quiche - a rich and creamy concoction of milk, cheese and eggs and whatever vegetable happens to be around. 

Although quiche is now a classic dish of French cuisine, it actually originated in Germany, in the medieval kingdom of Lothringen, when it was under German rule, and which the French later renamed Lorraine. The word 'quiche' is from the German 'Kuchen', meaning cake.

The original Quiche Lorraine was an open pie with a filling consisting of eggs and cream with smoked bacon. It was only later that cheese was added to it. Add onions and you have quiche Alsacienne. (In Germany, there is a wonderful dish called Zwiebelkuchen or "onion cake", that I adore). Though the bottom crust was originally made from bread dough, it has long since evolved into a short-crust or puff pastry crust. Though fillings vary, they are all variations on the same theme: a fantastically flaky buttery crust holding in place a custard of eggs and cheese. Comfort food at its finest.

Swiss Chard and Bacon Quiche

1 Quiche crust (see below)
2 shallots, minced
1 clove garlic, minced
4 oz. bacon, cut into lardons
1 1/2 lbs. Swiss chard, ribs removed
3 eggs
1 cup creme fraiche or heavy cream and sour cream combined
salt and freshly ground black pepper
4  oz. Gruyere or Swiss cheese, grated
 

Preheat oven to 350 F.

Fry the bacon. Remove from pan. Saute shallots in bacon fat (or remove bacon fat and add a little olive oil or butter) until translucent. Add the garlic and saute for 1 minute. Remove to the plate with the bacon. Divide the chard leaves from the ribs: chop the ribs quite small and shred the leaves. First, fry the ribs in the bacon fat until tender. Then, add the chard leaves to the pan, cover and wilt, about 4-5 minutes.

Beat the eggs together with the creme fraiche and season with salt and pepper.

Combine the shallots, bacon, chard stems and leaves. Fill the quiche crust with this mixture, then sprinkle with the grated cheese, and pour over the custard (egg and cream). Bake for 50-60 minutes until quiche is set and browned. Cool and serve at room temperature.

Crust:
In a bowl, combine 1 1/2 cups all-purpose flour and 1/4 tsp. salt. Add 1/2 cup (1/4 lb.) plus 2 Tbsp. butter, cut into chunks; mix to coat with flour. With your fingers or pastry blender, rub or cut the butter into the flour mixture until it resembles fine crumbs. Add 1 egg and stir with a fork until dough holds together. Shape dough into a ball. On a floured board, roll out dough and fit into a 10-inch quiche pan or pie pan. Make dough flush with top rim, folding excess dough down against pastry-lined side and pressing firmly in place. Flute edge decoratively. If made ahead, cover and refrigerate for up to 3 days. Bring to room temperature before using. Makes enough for 1 quiche.

Excellent served with a side salad and a glass of white wine. 

Print Friendly